
Recently my son and I went on vacation to Venice, Florida where we stayed at the beautiful Venice Beach Villas for 3 nights. There I noticed some attractive coleus plants they had growing in their landscape. I snipped 4 coleus cuttings from the backside and stuck them in a cup of water. The cuttings are about 5-6" long and only 2-3 leaves on top, the rest of the leaves were snipped off. After only 4 days the thicker cutting already has roots! I wonder if thickness of cutting has anything to do with the quick rooting? I will have to experiment with that someday.
Today it has been 6 days since I made the cuttings. The thick one is growing longer roots, but the other 3 still no visible sign of roots. No worries I think it just might take a little longer.


About 2 months ago I was intrigued by the idea of propagating Tropical Hibiscus, essentially making copies of the mother plant through stem cuttings. Six weeks ago my first experiment failed. I made stem tip cuts (soft and hard wood), putting the cuttings in a pot of moist perlite after dipping in a rooting hormone. The pot of perlite and cuttings is then placed in a saucer of water, allowing the perlite to wick the water as needed. The experiment failed because I didn't cover the cuttings with anything. Within a few days the leaves actually started to yellow and fall off.
So I revised my next experiment by covering the cuttings with a polythene plastic bag. On July 19th I made 5 hardwood stem cuts of Red Snapper hibiscus, dipped in rooting hormone, stuck them in the perlite pot and then covered. Covering the cuttings creates a greenhouse atmosphere of high humidity which prevents water loss. Several days go by and no yellowing like before. I noticed a huge difference by covering vs not covering. After 4 weeks look what I found....ROOTS! =)


Potted up the cuttings in their own gallon size pot with Miracle-Gro potting mix.

My first two plant clones! I've successfully propagated a red penta cutting and a succulent leaf. These two were pretty easy though. The penta was rooted in plain water and the succulent leaf was just laying peacefully on a pot of soil. The red penta took about 2 weeks to notice some root formation and the succulent about 3-4 weeks to notice a root coming out of the edge where it broke off.


eBay is a good source for just about anything, even live tropical plants shipped to your door. I wanted to find something rare and unusual, and the Dwarf Red Powder Puff plant fit the bill. I've never seen anything like it. It's a drought tolerant flowering shrub that can be maintained in a container or directly planted on landscape. The prolific buds look like clusters of small red berries and they seem to pop the next day into puffy balls. It's a unique flower that attracts butterflies and hummingbirds. I've only had the plant for about a week and it's already blooming like crazy so I think it's a real winner for our garden. It's fun, interesting, and easy to grow!


One hibiscus hybrid I grew from seed, the "Red White Splash", doesn't want to root very well. The leaves quickly wither down and fall off within a few days. I'm experimenting to see if this one will root, so today I setup a new cutting. The cutting is an all green stem tip about 3-4" long. I removed all the lower leaves except the top two. I dipped the end into Rootone and placed the cutting into a mix of Miracle Gro Seed Starting and perlite. I made sure there were 3 nodes buried in the Miracle Gro mix. I covered the cutting with an empty 2 L bottle with the bottom cut out. Just keep the cap screwed in to lock in moisture. The idea is to keep humidity in to prevent moisture loss from the leaves, hence the name Greenhouse Experiment in the title. Also I don't want to cook the plants either so I have to keep the covered cuttings out of direct sunlight.
Here is day one, fresh green stem tip cutting of "Red White Splash" hibiscus hybrid.

This upside down 2 L bottle creates the greenhouse environment.

In 2009 I learned there is actually an international society geared towards hibiscus hybridizing. They have hibiscus of the year voting and all that stuff too. Some of the hybrids that are generated look amazing, nothing like you can find in Home Depot or Lowes. In 2009 second place was awarded to Gator Magic, a Florida hybrid created by Bob Carran. I had to have it so I purchased it online. Here's a photo of my first bloom...

As you can see this is a plant worth having, only problem is it's hard to find now. I searched and came up with nothing, even eBay didn't have it. My option now is to clone this plant myself using propagation. The plant itself was neglected for a long time in a pot, which most of the soil leaked out. I'm surprised it's still alive. Nevertheless, I lucked out and it's still going. I pruned and repotted in fresh new potting soil. It has a bud growing on the top, so I didn't want to cut that stem. I found a small 3-4" tip cutting that will work though. I am using the water method to root this cutting since it's mostly tender green stem. Hopefully it works, if it doesn't, I still have a nice stem cutting waiting for me after the bud flowers. :)
Today I took some cuttings off some of the hibiscus I grew from seed in 2009. I'm using a gallon pot with side holes on the bottom. Fill the pot 2/3 full of moist perlite and sit inside a saucer of water. The water level in the saucer should always submerge the holes in the gallon pot. Because of the wicking properties of perlite, this method should keep the cuttings moist and also provide plenty of oxygen. I put the cuttings in a partial sunny area that doesn't get direct afternoon sunlight. In 4-6 weeks I should have duplicate mini copies of the plants below...
3 cuttings of Rosalind x Dragons Breath (image below)

2 cuttings of Sweet Bippee x Dragons Breath (image below)

Cutting in Perlite Experiment - Day 1

UPDATE 4 weeks later: None of these cuttings survived unfortunately. It was my first attempt and I think I took the cuttings from an already unhealthy plant, plus the stems were from last years growth I think. These hibiscus plants were neglected for so long but now repotted and bouncing back. Another thing I didn't do is cover the cuttings hold moisture in the leaves. So this experiment failed but I'll try again. :)
After taking a break from extreme gardening for awhile, and with some free time on my hands, I've decided to revisit the world of plant propagation and development again. In 2009, I started Tropical Hibiscus, Datura metel (purple trumpet), and Plumeria from seed. After successful germination and overwintering, these 6 year old plants are still alive today. Most still in containers as well.
The Datura had seeded itself and was actually growing outside the container. So with a little luck I carefully took it out and repotted it. It's dropping some leaves, but so far hanging on.
I have 3 Plumerias now, neither have bloomed sadly. Although they lacked fertilizer for several years, they are heavy feeders. In the picture there is one large and two smaller plumerias that just need bigger pots. All three plumerias are 6 year old plants, so you can see how much space for roots makes a huge difference in overall plant size and growth.

A few years ago I purchased a Purple Passionflower vine (Passiflora incarnate). It's a host plant for the Gulf Frit butterfly. The wasps have controlled the caterpillar population this year, therefore allowing a lot of lush green growth and it's even bloomed several times this year.

The Hibiscus I'll take pictures later when they are in better shape. The containers they were have leaked soil, so they need to be repotted. With a little TLC they will bounce back and should have blooms by the end of the year.
One of the wild vines we have in our backyard is a Cypress Vine, also known as the Hummingbird Vine. It has taken over a corner of our backyard and spreading fast all over the large Sago palm tree. This vigoriously growing vine has fernlike foilage with small bright red trumpets that bloom for 3-4 months in the summer and fall.
This plant has attracted our first hummingbird in our area. It visits briefly about once a day checking out the red flowers on this vine. Now we put a new hummingbird feeder outside on a shepherds hook. They haven't found the feeder yet but it's in the right location close to the cypress vine. We'll see how well the hummingbird feeder works out by the end of the year. 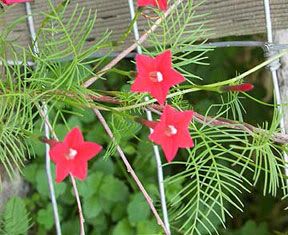
In this post I will briefly update the birds we've seen in our backyard recently.
First I'll start with the year-round residents who seem to have found a local home here. The most common bird around our feeders are the Mourning Doves. At least 2-3 visit everyday, while some days I see up to 8 or 9 doves fighting over a spot to eat. 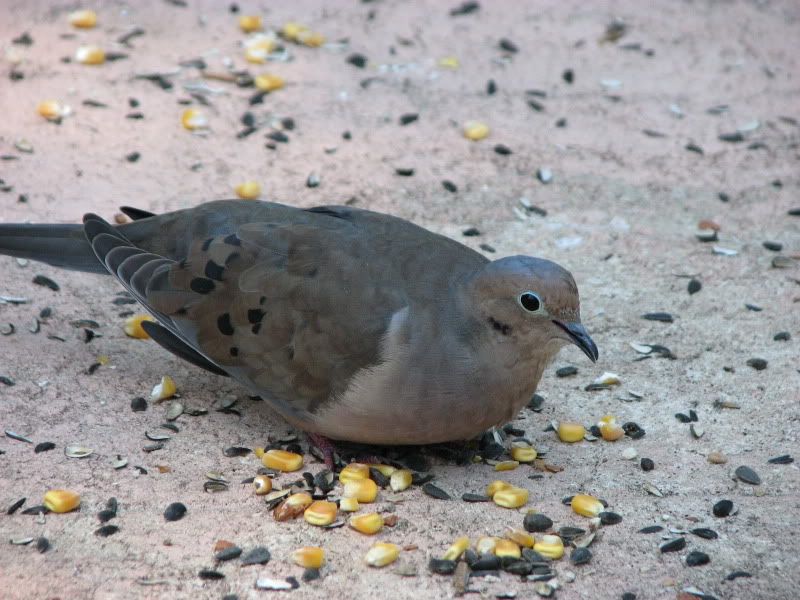
The Tufted Titmice are still here, usually in small groups of 2 or 3. I can always tell when a hawk is in the area since these titmice are very vocal to alert others of a possible threat.
The male and female pair of Cardinals are still here too. They usually travel together and occassionally the male will feed the female.
My favorites are a couple of Black-capped Chickadees that seem to travel with the Tufted Titmice often. These small chickadees are the most adorable birds ever, and their calls are even more adorable.
And finially here's a female Painted Bunting that recently showed up since the first cold snap that hit our area last week. I remember seeing these birds last fall/winter, so I'm pretty sure they are migrating from the north. 
